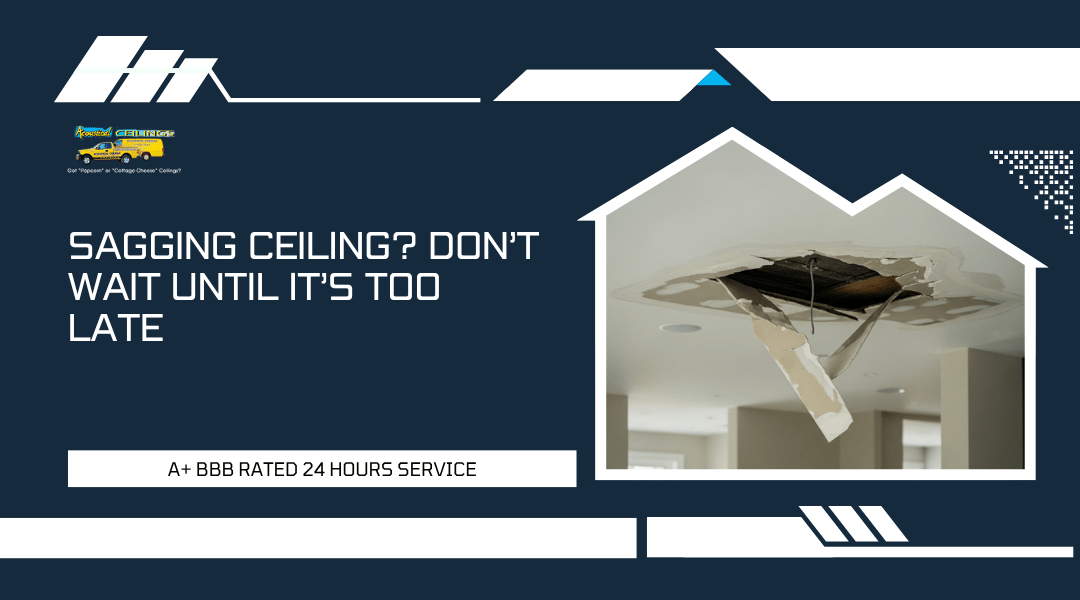
A sagging ceiling is more than just an eyesore; it can signal serious structural problems in your home. Taking action early can save you time, money, and stress. If you notice drooping, bulging, or cracks in your ceiling, it’s important to assess the situation right away. Ignoring these signs can lead to more significant damage and costly repairs later on.
At Acoustical Ceilings, we understand how vital it is to maintain a safe and appealing space. You may wonder, what causes a ceiling to sag? Common reasons include water damage, old age, or improper installation. It’s crucial to identify the root cause so you can choose the best solution for fixing it.
In this article, you will learn practical steps to address a sagging ceiling effectively. From simple repairs you can do yourself to knowing when to call a professional, we’ll guide you through the process. With the right approach, you can restore your ceiling and enhance the overall look of your home.
What Causes a Ceiling to Sag?
A sagging ceiling can be caused by various factors that you should be aware of. Identifying the root cause is crucial to prevent further damage and ensure your ceiling remains safe and stable. Below are some common issues that lead to ceiling sagging.
Water Damage From Roof or Plumbing Leaks
Water damage is one of the most common causes of sagging ceilings. If there are leaks in your roof or plumbing, moisture can accumulate in the ceiling materials.
When this happens, materials like drywall can become heavy and bow downwards.
Signs of water damage include:
- Stains or discoloration on the ceiling
- A soft or spongy texture when pressed
- Mold growth in severe cases
To address these issues, it’s essential to fix any leaks as soon as possible. This may involve hiring a roofing contractor for roof issues or a plumber for plumbing-related leaks.
Foundation Settling or Structural Shifting
Another significant cause of ceiling sagging is foundation settling or structural shifting. Over time, homes can settle into the ground or experience changes due to soil erosion or drainage problems.
This shift can put pressure on the ceiling joists, causing them to bend or sag.
Signs to watch for include:
- Gaps between the walls and ceiling
- Cracks in walls or around windows and doors
- Uneven floors
If you notice these signs, it may be necessary to consult a foundation specialist. They can assess the condition of your home and suggest corrective measures.
Poor Installation of Drywall or Ceiling Joists
Improper installation of drywall or ceiling joists can lead to sagging problems. If the ceiling joists are not spaced correctly or the drywall is not securely attached, it can create weak spots.
These weaknesses can cause the ceiling to sag over time.
To ensure proper installation, check:
- Joist spacing (typically 16 inches apart)
- The quality of the materials used
- The fastening techniques employed
If your ceiling was poorly installed, consider hiring a professional contractor to reinforce or replace the affected areas.
Age-Related Wear and Tear
Like many home features, ceilings age and can show signs of wear and tear. Over time, the materials can deteriorate due to environmental factors and regular use.
This deterioration can lead to sagging if not addressed.
You may notice:
- Cracks forming in plaster or drywall
- Loose or crumbling ceiling materials
- Increased dust or debris falling from the ceiling
Regular maintenance can help prolong the life of your ceiling. Inspecting your ceiling periodically can catch issues early, preventing more extensive repairs down the road.
Early Signs Your Ceiling Might Be Sagging
Recognizing early signs of a sagging ceiling is crucial for timely repairs. By paying attention to specific warning signs, you can prevent worsening damage and costly repairs in your home.
Visible Bowing or Dips in the Surface
One of the first signs of a sagging ceiling is visible bowing or dips. This often appears as an uneven surface. If you notice areas that seem lower than the surrounding space, it could indicate a potential problem.
Small dips may not seem alarming but can worsen over time. It might suggest that your ceiling’s structure is weakening. Keep an eye on these changes, especially after heavy rains or snowfall, which can add extra weight.
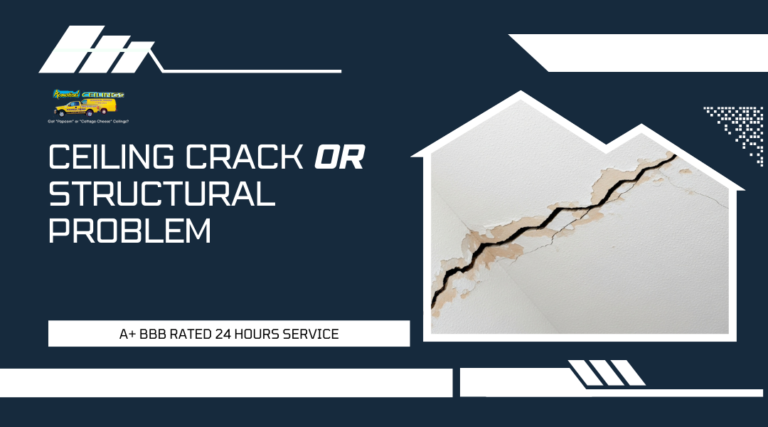
Cracks Along Ceiling Lines or Corners
Watch for cracks that appear along the lines or corners of your ceiling. These cracks can range from tiny hairline fractures to more significant splits. If you notice these disturbances, it’s important to address them soon.
Cracks may develop due to changes in humidity or shifting structures. They often indicate that the ceiling is no longer adequately supported. If you find cracks, especially in a pattern, it’s a signal to investigate further.
Noises Like Creaking or Popping
Unusual noises such as creaking or popping may occur when you walk underneath a sagging ceiling. These sounds usually indicate that the materials are shifting or separating. It’s vital to pay attention to these noises, as they can be more than just an annoyance.
If you hear creaking when the temperature changes, it might mean the materials are expanding or contracting. Regularly listen for these sounds, especially in areas where you’ve noted structural issues previously.
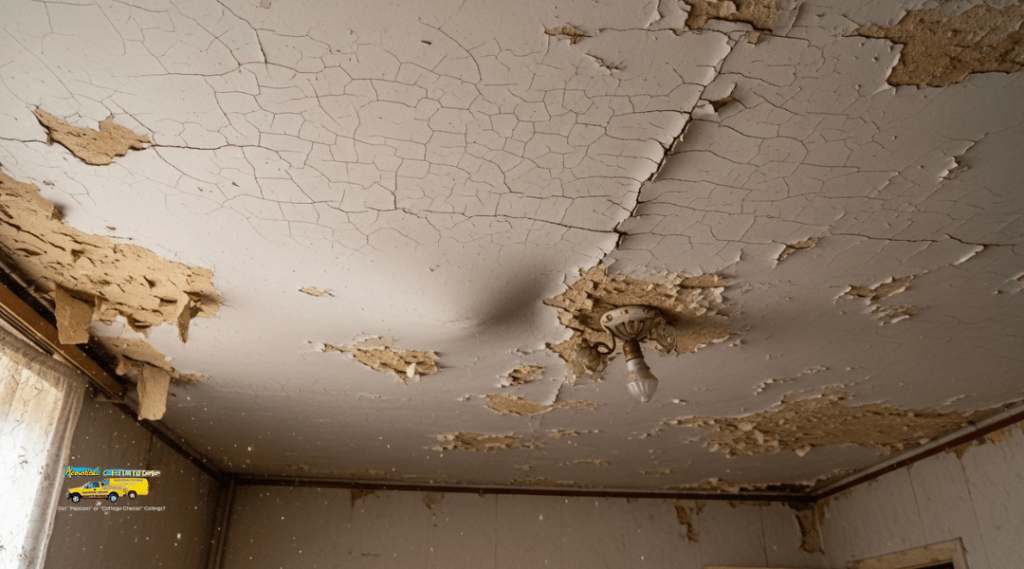
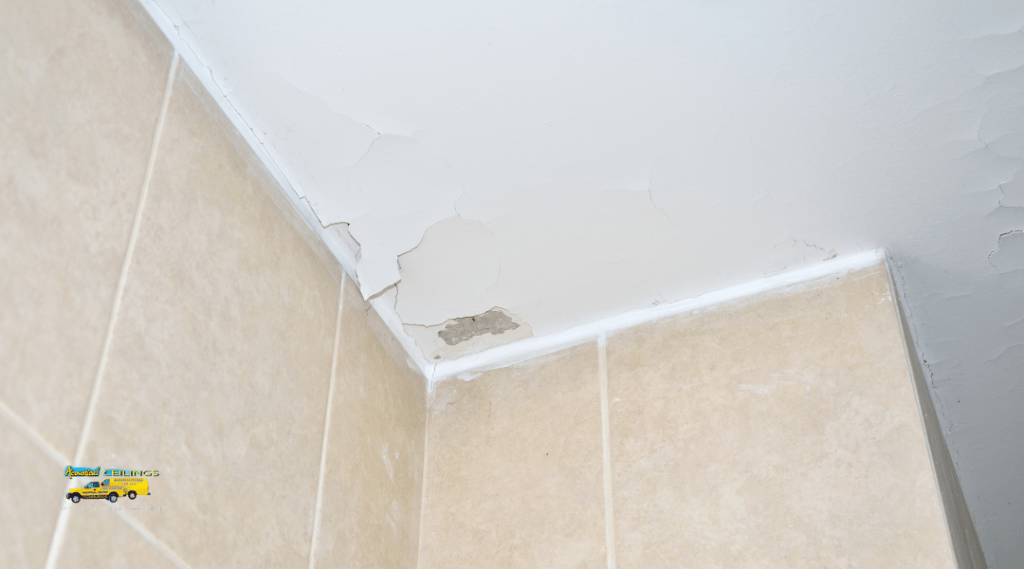
Stains, Discoloration, or Peeling Paint
Water stains on ceilings often signal that moisture is present, which can contribute to sagging. Look for brown or yellow stains, which indicate leaks from above. These stains may develop from plumbing issues, roof leaks, or high humidity.
Discoloration can weaken ceiling materials over time and lead to more extensive problems. Peeling paint is another sign that moisture has penetrated the ceiling. If you see any peeling or bubbling, it is a clear call to take action. Address these issues before they lead to further damage.
Risks of Ignoring a Sagging Ceiling
Ignoring a sagging ceiling can lead to serious problems. Addressing these issues promptly can save you from dangerous situations and costly repairs. Here are some risks you should consider.
Structural Collapse and Safety Hazards
A sagging ceiling can indicate underlying structural issues. Over time, the weight of the ceiling may cause it to collapse. This is especially dangerous in areas where people frequently gather.
If the ceiling gives way, it can lead to injury. Heavy materials, such as plaster or drywall, can fall unexpectedly. This poses a risk not only to residents but also to pets and visitors.
You must be aware of signs like large cracks or visible sagging. If you notice these, it’s crucial to consult a professional to assess the situation.
Expensive Emergency Repairs
When a ceiling sags, ignoring it can lead to emergency repairs. Fixing a collapsed ceiling is significantly more expensive than addressing sagging early.
You may face not only repair costs but also potential damage to furniture and flooring below. The longer you wait, the more complicated and costly the fixes become.
Addressing the issue promptly can prevent larger problems. Regular maintenance and inspections can help identify issues before they escalate. Don’t let a small problem turn into a large expense.
Decreased Property Value
A sagging ceiling can negatively impact your property’s value. Potential buyers may see this as a red flag during inspections.
It suggests neglect and can lead to lower offers. Buyers often avoid homes with visible damage, fearing hidden repairs.
If you plan to sell, addressing the sagging ceiling will make your property more appealing. Investing in repairs can offer a good return when it’s time to sell your home.
Regular upkeep ensures better aesthetics and maintains market value. A well-maintained ceiling reflects overall home quality.
Mold and Mildew Growth
Another serious risk of ignoring a sagging ceiling is the potential for mold and mildew growth. A sagging ceiling often traps moisture, creating a perfect breeding ground for mold.
Mold can spread quickly and cause health issues like allergies and respiratory problems. It can affect air quality and lead to significant cleanup costs.
Once mold takes hold, it requires professional removal, which is often expensive. You need to address the moisture problem alongside the ceiling issues to prevent mold from returning.
Acting quickly to fix a sagging ceiling helps keep your home safe and healthy. Don’t wait for mold to become a bigger problem.
How to Assess the Severity of a Sagging Ceiling
Assessing the severity of a sagging ceiling is crucial for preventing further damage. You can take several steps to evaluate the issue effectively. This involves examining the ceiling visually, measuring the dip, knowing when to seek help, and understanding local building codes.
Performing a Visual Inspection
Begin with a thorough visual inspection of your ceiling. Look for signs of sagging, such as noticeable dips or uneven surfaces. Check for cracks, water stains, or any discoloration, as these may indicate water damage or structural issues.
Pay attention to the material of the ceiling. Different types of ceilings, like drywall or plaster, may sag differently. If you spot yellow or brown stains, this could signify a leak.
It’s also important to observe the surrounding environment. Are there any signs of mold or mildew? This could indicate prolonged moisture presence, which may worsen the sagging.
Using a Level or Straight Edge to Measure Dip
Next, you should measure the sagging. A level or straight edge is an effective tool for this. Place the straight edge across the sagging area. Check the gap between the straight edge and the ceiling.
Ideally, there should be minimal or no gap. If you notice a gap of more than 1/4 inch, this could signify a more serious issue. Make note of the measurements, especially in different areas. This will help you understand the scope of the problem.
Record your findings to provide a detailed report if you need professional assistance.
When to Call a Professional Like Acoustical Ceilings
Knowing when to call a professional can save you time and money. If your inspection reveals significant sagging—more than 1/2 inch or if you find cracks—it’s time to seek help.
Similarly, if you discover water damage or mold, professional intervention is critical. Ignoring these signs could lead to more costly repairs later on.
A qualified contractor, like Acoustical Ceilings, can offer solutions tailored to your needs. They have the experience to address various ceiling types and issues.
Understanding Local Building Codes in Rancho Cucamonga
Familiarize yourself with local building codes in Rancho Cucamonga. These codes dictate how ceilings should be constructed and repaired. Knowing these regulations can help you avoid fines or issues when making repairs.
Check the requirements for ceiling heights, materials, and safety standards. Ensuring your ceiling complies with local codes may also increase your property’s value.
Researching these codes ahead of time can help you during your assessment. If necessary, discuss any concerns with a professional contractor who understands these regulations. This knowledge will aid in making informed decisions.
Step-by-Step Guide to Fixing a Sagging Ceiling
Fixing a sagging ceiling requires careful attention to detail. You need to determine the cause of the sag, remove any damaged materials, and then repair or replace the structural components as needed. Follow this step-by-step guide to ensure a successful repair.
Step 1: Identify the Root Cause
Before you begin repairs, identify what caused the sagging ceiling. Common causes include water damage, which can come from roof leaks or plumbing issues. Look for stains, discoloration, or sagging ceiling tiles that might indicate water exposure.
If you find signs of moisture, address the leak first. If the ceiling is sagging due to structural issues, inspect the joists or framing. This will guide your next steps in fixing the problem effectively.
Step 2: Remove Damaged Drywall or Tiles
Once you know the cause, it’s time to remove any damaged materials. Start by carefully taking down sagging ceiling tiles or sections of drywall. Use a utility knife and pry bar for easier removal, ensuring you don’t damage surrounding areas.
As you remove the materials, check for hidden mold or mildew that can occur with water damage. Any remaining damage must be resolved before proceeding. It’s essential to create a clean work area for the next steps.
Step 3: Reinforce or Replace Joists/Framing
If the joists or framing are compromised, they might need reinforcement or replacement. Check for signs of warping or rot. If the damage is extensive, you may need to install new joists.
For minor issues, you can reinforce existing joists with additional support beams. Ensure that any repairs meet building codes to maintain safety. This step is critical to support the new ceiling securely.
Step 4: Install New Drywall or Ceiling Panels
After addressing the structural issues, you can move on to installing new drywall or ceiling panels. Cut the drywall to fit the space, ensuring it lines up with existing structures. Secure the new panels to the joists using drywall screws.
If you’re using ceiling tiles, make sure they are compatible with your current system. This ensures proper fit and function. Once installed, your ceiling should be level and ready for finishing touches.
Step 5: Finish With Tape, Mud, and Paint
To complete the repair, tape the seams and apply joint compound, commonly known as mud. Use a putty knife to smooth the mud over the joints and allow it to dry. You may need to apply multiple coats for a flawless finish.
Once dry, sand the surface until it’s smooth. After sanding, use a stain-blocking primer before applying your final coat of ceiling paint. This will help conceal any imperfections and ensure a sleek look for your ceiling.
By following these steps, you can effectively repair a sagging ceiling, restoring both function and appearance to your home.
Professional vs. DIY: What’s the Better Option?
When dealing with a sagging ceiling, you face a choice between DIY fixes and hiring a professional. Each option has its own benefits and drawbacks, so it’s essential to know when to tackle the job yourself or call in an expert like Acoustical Ceilings.
When DIY Makes Sense (Minor Sag, Cosmetic Issues)
Taking the DIY route can be suitable for minor sagging or cosmetic issues. If the sag is slight and primarily aesthetic, you may choose to use simple repairs.
For tasks like:
- Reinforcing ceiling supports
- Applying a fresh coat of paint
- Using adhesive for small cracks
These projects often require basic tools and materials you might already have. If you are comfortable using a ladder and basic repair equipment, a minor sag can be a manageable task.
When to Hire a Drywall Contractor Like Acoustical Ceilings
If you notice significant sagging or suspect structural problems, hire a professional drywall contractor. Ignoring serious issues can lead to costly repairs later.
Consider contacting Acoustical Ceilings for:
- Structural damage
- Extensive sagging
- Water damage assessments
Professionals have the expertise to provide long-lasting solutions. They understand the mechanics of ceilings and can ensure that your home remains safe.
Pros and Cons of Each Approach
Here’s a quick look at the advantages and disadvantages of DIY versus hiring a pro.
| Approach | Pros | Cons |
|---|---|---|
| DIY | Cost-effective, Immediate results | Limited expertise, Risk of further damage |
| Professional | Expertise, Quality assurance | Higher cost, Dependence on scheduling |
Choosing the right option depends on your specific circumstances. For minor issues, DIY can save money. For significant problems, a professional like Acoustical Ceilings can provide the necessary knowledge and skill to properly fix your ceiling.
Preventative Measures to Avoid Future Sagging
Taking steps now can help you avoid sagging in your ceilings later. By focusing on regular maintenance and using the right materials, you can enhance the integrity of your ceilings and prevent costly repairs.
Routine Roof and Plumbing Inspections
You should schedule regular inspections of your roof and plumbing. Look for leaks, damage, or any signs of water intrusion. Moisture is a leading cause of sagging ceilings.
After heavy rains or snow, inspect your roof for missing shingles, sagging areas, or other damage. Also, check your plumbing for leaks. Even small leaks can lead to water accumulation, causing ceilings to sag.
Consider hiring a professional to evaluate your roof and plumbing systems, especially if you notice any issues. Regular maintenance can save you from more serious problems down the line.
Upgrading to Moisture-Resistant Materials
Using moisture-resistant materials is crucial for preventing sagging. Consider replacing standard drywall with moisture-resistant options in areas prone to humidity, such as kitchens and bathrooms.
Materials like Green Board or Cement Board can withstand damp conditions better than traditional drywall. These materials help resist condensation, which is a primary factor in ceiling sag.
Also, when installing ceilings, use adequate waterproofing techniques. This includes taping and sealing joints. By investing in these materials, you’ll reduce the risk of sagging caused by moisture.
Proper Attic Ventilation and Insulation
Proper attic ventilation is essential to control temperature and moisture levels. Make sure your attic has enough vents to allow airflow. This helps reduce heat and moisture buildup, which can cause condensation.
Consider adding vents such as ridge vents, soffit vents, or gable vents. These can help circulate air, preventing moisture accumulation.
In addition, ensure your insulation is installed correctly. Adequate insulation keeps your attic cooler and reduces the chance of heat escaping into colder areas. Proper ventilation and insulation work hand in hand to minimize the risk of ceiling sagging.
Annual Ceiling Condition Checks
Paraphrasing, perform annual checks on your ceilings for signs of sagging, cracks, or water stains. Early detection can prevent further damage.
Focus on identifying any unusual bulges or dips in the ceiling. Check for signs of mold or discoloration, which indicate moisture issues. If detected, address these problems immediately to avoid worsening conditions.
Keep a record of any repairs or changes. Understanding the history of your ceiling can help you spot trends and identify potential problems early. An annual inspection keeps your ceilings in good condition and helps avoid sagging in the future.